How to Ice Magic Cookies

January 9, 2012 § Leave a comment

If you checked out our blog about Ella’s amazing Magic Birthday Party and wanted to make those adorable cookies at home, here’s how…

Buy the adorable Sweet Dani B bunny in hat and magic wand cookie cutters from CopperGifts and bake them up using your favorite cookie dough.

magic cutters

Since the bunny in hat on the larger side, sugar cookie dough is the safest bet

May the icing magic begin…

blank bunny cookie

I mixed yellow, black and white royal icing and always have my tools ready to go...

Ice the rectangle hat band

Using thin SDB bottle, ice the rectangle hat band- add candy decor if you like- on this one I kept it simple...

Ice the black top hat

Using thick SDB bottle, ice the black top hat... let dry for 8 hours or overnight.

Prep for magic wand cookie, black icing, M&M's, black sanding sugar

Prep supplies for magic wand cookie: black royal icing, M&M's, black sanding sugar...

Note: the cracks you see at my cookie edges here are because the dough was used and re rolled several times. Since this cookie was just for a demo, I figured you wouldn’t mind. They are still delicious!

Ice black magic wand handle, add white M&M's or other candy for decor

Ice black magic wand handle, add white M&M's or other candy for decor...

Sprinkle sanding sugar...

TaaaDaaaa! Sprinkle sanding sugar... let dry 8 hours or overnight.

Good morning, dry bunny in hat!

Good morning, dry bunny in hat!

Prep bunny supplies: white royal icing, candy bead eyes, M&M nose, coarse sanding sugar

Prep bunny supplies: white royal icing, candy bead eyes, M&M nose, coarse sanding sugar, candy heart

Using thick SDB icing bottle, outline then fill bunny

Using thick SDB icing bottle, outline then fill bunny...

Add candy bead eyes, M&M nose, heart, then sprinkle with sanding sugar

Add candy bead eyes, M&M nose, heart, then sprinkle with sanding sugar... let dry 8 hours or overnight

Good morning, dry magic wand!

Good morning, dry magic wand!

After icing white magic starburst shape, add yellow dot to center

After icing white magic starburst shape, add yellow dot to center (while wet)...

While wet, draw lines around the dot- it will look like a target...

While wet, draw lines around the dot- it will look like a target (it can be a little uneven)...

While wet, take toothpick and drag line from center dot to each starburst point...

While wet, take toothpick and drag line from center dot to each starburst point...

While wet take toothpick and drag lines in between points, in opposite direction...

While wet take toothpick and drag lines in between points, in opposite direction...

Let bunny in hat dry completely. Note cuteness of bunny, ask husband for pet bunny

Let cookies dry completely. Note cuteness of bunny, ask husband for pet bunny...

When bunny and wand are dry set up beauty shot.

When bunny and wand are dry, set up beauty shot... "Zap" bunny in hat with magic wand while wishing for pet bunny even though husband said no.

Sing abra abra cadabra while planning excellent Magic Party to share them with your friends!  Enjoy your Magic Cookies!  Xo Dani


Cookie Magic

January 5, 2012 § 4 Comments

*Bunny in Hat cookie

And now for my next trick...

“So how would you feel about following a magician?” Not a question I hear everyday, but, when my cousin Lauren asked me to do a cookie workshop at a magic party I was curious to find the answer to that exact question!

Ella, Lauren’s daughter and the birthday girl, is a lot like her mom and myself… we Boglivi girls (Boglivi is my maiden name) are not super girly girls. Ella’s good with pink but likes purple more and enjoys all sorts of fun after school activities- one, being magic class! (How cool is that?) Lauren knew this would be a really great birthday theme for boys and girls and she was right.

Magician props

The results of some fun and amazing magic tricks!

The party started with a fabulous magician named Ben (who is also Ella’s magic teacher). He performed some super fun tricks… Slight of hand, dollar revealed in a peeled banana, bent quarter… really cool stuff! After the magic show, Ella’s Dad led the kids in piñata fun. The piñata has made a big party comeback and this was no exception.

Pinata

"Hey, number 8- we are coming for ya!"

Magic table setup

Our "magic table" setup

Next up, COOKIES! While that is how I feel about them, the kids always seem to start off a bit quiet. I showed them our workshop coloring templates and explained what we would be working on. Once I mentioned we’d be icing a magic wand that would be ‘so much more delicious’ than Harry Potter’s, the cookie decorating was off to a great start.

Magic wand work

Magic wand work... I gave them a few ideas for inspiration

Will with wand

Ella's brother, Will, concentrating on magic wand icing

bunny and wand

Ella's excellent magic wand, and adorable bunny sketch...

Next up the bunny in hat cookie… Unfortunately the magician didn’t have a tie in with the bunny in hat (Dear Magicians, Please work with me! Isn’t a bunny in hat a required prop?) so I’m not certain the kids fully got the meaning of this cookie, but no matter. As I was demoing the bunny and added the sanding sugar to make his fur, someone yelled “furry bunny!”and it was on! The kids really got into this one…

Ella smiling

The birthday girl working on her bunny cookie

Hop to it! These bunnies aren't going to decorate themselves!

Hop to it! These bunnies aren't going to decorate themselves!

Bunny amazingness- I love the heart nose!

Bunny amazingness- I love the heart nose- I might have to borrow this idea!


A very well done bunny with a fabulous hat to boot!

A very well done bunny with a fabulous hat to boot!

personality bunny

and look at this bunny- what personality! and another heart nose... these kids are on to something!

After cookie decorating was finished, it was time for birthday cake. One of my favorite parts of a party is singing “happy birthday”. Since I have a terrible voice, I used to be shy about it, but not anymore. Last year, I got to thinking that singing “happy birthday” is one of those moments people might take for granted… like the sun and moon rising each day… but if you think about it, how many times will we get to sing it? Its a privilege! An honor! I hope I didn’t embarrass Ella too much but joined in with her parents and all her friends and we sung it proud.

family candle blowout

Mark and Lauren jump in to help Ella blow out her candles

Birthday Party Success? Check! Birthday Party Magic? Yep, we got that too! All good things to Ella for the amazing eights!  Xo Dani

**Look for my how-to ice the bunny in hat (one of our Sweet Dani B cutter designs) and magic wand cookie coming up next post!**


A Winter Woodland Cookie Wonderland

December 6, 2011 § 4 Comments

Being a designer and decorator of events, its a rare occasion that I attend a party or a wedding without some sort of prop in tow.  Lucky for me, KF loves “the juice” that goes along with the behind the scenes action. Also, it doesn’t hurt that as a designer himself, he can easily jump in and lend a trustworthy helping hand.

Most ladies carry beautiful clutch handbags to weddings...

My decorating kit bag (most ladies carry beautiful clutch handbags to weddings)

My brother’s wedding was definitely one of these such occasions as I had the pleasure of designing their paper goods and decorating their wedding cake.

The handpainted wedding invite

The hand painted woodland wedding scene on the wedding invite

Their big day took place at the Westmount Country Club in NJ. If you haven’t been to the Westmount before, its one of those expert event venues that prides itself in hosting amazing events and they do it very, very well. Almost every detail is taken care of in house and they run a very tight ship. Since their reputation proceeds them, I was naturally a little nervous.

I spent days before working on the cookies… a custom Nicole bride & Bogues groom topper, their cat Leeloo, and approx. 75 mini woodland animals: deer, lovebirds, bunnies and of coarse owls!

Squirrel minis decorated with mini sugar hearts

Squirrel minis decorated with mini sugar hearts

Lovebirds packed up and ready to go

Lovebirds packed up and ready to go

Hearts brushed with gold shimmer dust

Hearts brushed with gold shimmer dust

Leeloo

I felt like I really captured Leeloo's powers of staring

Right before we arrived I realized that I had not discussed logistics of decorating the cake but Bobby, the banquet manager of the Westmount, whisked us right back into the huge kitchen where I was immediately comforted by fond memories of my waitressing days in their busy, loud, bustling kitchen.

Unpacking my cookie wares in the kitchen

My waitressing nickname was "Sweet Dani B"- That's where I got my biz name!

I always do two bride & groom toppers in the case that one breaks

I always ice two bride & groom toppers in the case that one breaks

Top layer cookies first...

(Delicious chocolate cake from Palermo's bakery) Started with top layer cookies first...

... then fill in with assorted animals, candy hearts, mini (edible glitter) pinecones

... then fill in with assorted animals, candy hearts, mini (edible glitter) pinecones

I got choked up as we were finishing- when that happens I know its a keeper!

I got choked up as we were finishing decorating... when that happens I know its a keeper!

The room looked beautiful decked out in winter woodland white. I love that the Westmount sets their tables with silver chargers- its a beautiful touch.

Winter wooldland animal ornaments acted as favors and menu holders

Winter woodland animal ornaments were the favors and menu holders

First cut wish? All good things! xoxo

Time to cut the cake! First cut wish? All good things! xoxo

Woohooooo! What a great wedding!

Chocolate wedding cake- wise choice! Woohooo- What a great wedding!

Here’s to a happy marriage for Christian & Nicole and a lifetime full of sweetness!  Xoxo Dani

D.I.Y. Shark Party Hat

July 31, 2011 § 1 Comment

As it turns out, Shark Week usually coincides with my husband’s birthday and he LOVES sharks. This year we planned to have a fun party with our friend’s and their adorable kiddies, so I thought it would be super fun to make our own shark hats.

I started out with plain paper party hats purchased at Party City. I bought 3 packs (some matte, some metallic) so I could use only the colors that matched our theme.

Party Hat Stack

We went with shades of blue plus 2 pink (1 pink for me of coarse!)

Using a 1 inch circle punch, we punched dark grey and black paper to use for the eyes and attached them with glue dots. We used plain white paper cut in strips and then triangles for the teeth.

Shark Party Hats with Eyes

We kept our inspiration close just in case...

On the inside front brim, I drew a line with craft glue and attached the white triangles in a row.

Shark Hat Glued Teeth

Since sharks have crazy uneven teeth, the triangles don't have to be perfect!

Shark Mug

Drinking coffee from a shark mug during this project makes it even more fun!

Place the hats on their sides while the teeth dry for about 10 minutes.

Shark Hats on sides

Pink Shark Hat= AMAZING!

Shark Hat bent teeth

Once the teeth are dry in place, bend them forward

Shark Hat Beauty

I placed them on a table and let our guests choose their sharks

Shark Hat w Cake

Totally Jawsome!

Add shark cake and candles

Add shark cake and candles for a totally amazing shark party finale!

Happy Shark Week! Happy Birthday Keith! Xoxo

Happy Birthday Owl Cake Topper

July 19, 2011 § Leave a comment

My friend, Amanda, inspired my owl love years ago when she gifted me this amazing necklace from a shop in Rhode Island.

Owl Necklace

My Owl Necklace from Amanda- just the beginning!

On her birthday this year, I decided to send some owl love back her way and volunteered to make her birthday cake topper. I baked a giant owl sugar cookie from my collection of oversized “vintage” Martha by Mail cutters. Since the cookie is so big, I baked it with 2 skewers to steady it.

Before icing I made sure I had all adornments ready to go. This is a big surface area and I didn’t want the icing to dry before I could ice the feathers and add everything on…

Baked Giant Owl

Baked Giant Owl waiting to be decorated

I used this crazy cool “satellite” candy I found in the grocery store for the eye orbs…

Satellite Wafers

I LOVE the vintage looking packaging!

Satellite Candy Wafer Inside

Look what's inside! So festive!

Next I mixed up the Amanda color palette: Orange, deep pink, brown and yellow…

Icing Bottles with Amanda Owl Icing

A few of Amanda's favorite colors!

I snipped my bottle tip to allow icing flow more quickly and iced the entire surface area in orange.

Icing Bottle with snipped tip

The icing comes out much faster this way

I especially LOVE this XL candy heart. My friends at coppergifts.com sent me these and I’ve been hoarding them! This was the perfect occasion to break one out! I let the body dry overnight.

Owl cookie drying

Goodnite Mr. Owl!

In the morning I added the owl wings. At first I tried a similar pattern in opposite colors but it looked too busy so I scraped it and settled on bright pink wings covered in sanding sugar.

Scraped icing blob

Look at how pretty my scraped icing blob was!

Last touch was to pipe on the eye balls using brown royal icing. I let the cookie dry for 8 hours and gathered my “cake topper kit”.

Owl Cake Topper & Supplies

This Owl is ready to party!

Little did I know I wouldn’t have room for all these items… The cake was smaller than I was picturing but Amanda’s Owl looked extra majestic as a result!

Giant Owl on cake

the Giant Owl makes his entrance...

Amanda and Birthday Owl became fast friends and even though her dinner guests really wanted a taste… She just couldn’t eat him!

Amanda and Giant Owl

Whoooo wants cake?

Here’s to another SWEET friendship! Xoxo

Do-It-Yourself: Trees as Party Centerpieces for Any Occasion

May 24, 2011 § 1 Comment

Event Styling: Tree Decorating Isn’t Just for Winter Holidays

Today we are going to cover one of our favorite ideas for centerpiece decorations – the “tree”.  A tree?  Yes! with a little planning and prep time, tree centerpieces are super sweet, whimsical and a great conversation piece. This is particularly fun if you use the trees to hang custom cookies, party favors or message cards.  The added bonus is at the end of the party, everyone un-decorates the trees and takes the ornaments home as favors.  Investing in a handful of trees is a great idea because you can use them year-round, and showcase all of them at Christmas time!

Sweet Dani B Event Styling - centerpiece-tree-party-ideas

Click to Enlarge

How-to Video on Preparing Custom Cookies for Tree

Matching Centerpieces to Party Themes

For many people, the centerpiece for their tables is usually the most difficult to match to a theme.  Flowers tend to be the go-to decoration (for adult parties), but unless you really know how to arrange them, the tables don’t look finished and paying for a florist can be expensive.  Balloons work (for birthday and kid parties), but getting a large number of them into a small car is never fun.  I can’t tell you how many we’ve popped in transit!

Once you have decided on a theme, you can easily find matching cookie cutters and use them as your template for baking cookies, creating message cards (out of card stock), and even as the decoration (and party favor) themselves!

Ideas for Tree Table Centerpieces

1.  Feather Trees for Centerpiece Decorating

White Feather Tree with Leaping Ballerina

White Feather Tree with Leaping Ballerina

Our obsession with feather trees has grown over the years so Dani tends to keep an eye out for them.  “Google search” feather trees and you’ll see dozens of choices.  Be careful with the size – make sure they will be big enough to hold your cookies and that they have a sturdy base.  One of our favorite feather trees is the Grandin Road tree which we feature in our How-To Decorate Cookies video segment.

2.  Branches for Centerpiece Decorating – Cookies & Message Cards

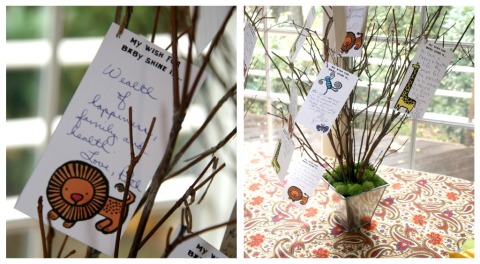
Sweet Dani B Custom Cookie Trees Made from Branches

Custom Cookie Trees Made from Branches

You can go to a local florist, Pier 1 Import, or (if in New York) the flower district to buy branches like these.  They just have to be sturdy enough to hold your ornaments.  You have nothing to worry about if you plan to hang message cards from them.

Tips for Hanging Custom Cookies

To secure your branches use marbles, floral foam, or styrofoam.  Marbles are great because they add weight, but are the more expensive option.  If you balance the branches and the cookies or ornaments well, you shouldn’t have too many problems. The key is to test the tree with the exact number of ornaments days before your event.  We recommend you search Amazon for best retail prices and other vase ideas (search: floral arrangement supplies).

Sweet Dani B Event Styling Wishing Tree

Click to Enlarge

Message Card Ideas

You can match cookies to message cards by using your cookie cutter to outline the shape of your card.  Hang cards for:

  • Place Card Tree | Table Number Display
  • Special message to guests
  • Hang blank cards so that guests can write/hang messages for the guest of honor
  • Pictures related to the event; use craft scissors to give it a special flare!

3.  Cupcake “Tree” Towers

Sweet Dani B Event Styling

While these aren’t exactly trees, setting up a cupcake tower is beautiful and the shape reminds us of a pine tree. Choose one color frosting per table, and add a miniature custom cookie to the top cupcake!  We love miniature cup cakes, and you can buy them by the dozen at the supermarket.  Make your own icing colors to match your theme.

More cupcake centerpiece decorating ideas:

Dani B Event Styling: Baptism | Cupcakes on a Tree Trunk

Where Am I?

You are currently browsing entries tagged with party themes at THE JUICE.